Docker is an open platform that helps developers, testers, and Ops team to develop, test, and deploy containers to different environments faster and in an efficient manner.
Multiple containers can be hosted in one virtual machine so:
- It reduces the need to configure virtual machines,
- Containers are hosted in isolation and they cannot affect each other.
- Containers sharing the OS core and it leads to smaller size, faster boot time, as well as better utilization of resources
- Containers can be stored and be reused for future use
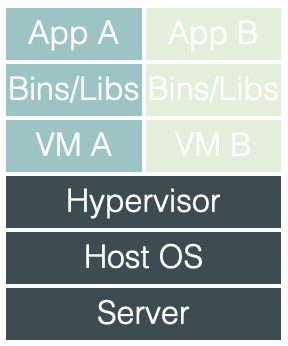
The legacy implementation that is purely based on VMs, uses a VM per application and all VMs are managed by a Hypervisor:
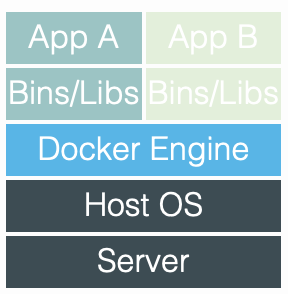
In the container based approach, The Host OS is shared between different containers:
In other words Docker can be (informally) called as a versioning system. However, the versioning is not on the source code, but on the containers running the code.
For complete overview and architecture of Docker, please check Docker documentation.
Prerequisites
In order to prepare and host Docker containers on Azure, first we need to install the following tools on our local machine.
Installing Azure Cross Platform CLI Tools
Cross Platform CLI is available for all platforms in order to interact with Azure. The easiest way to install it on any OS is to use Node Package Manager (I am using a Linux VM on my machine – For other OSes refer to the documentation):
- Install Node.JS and NPM:
sudo apt-get update
sudo apt-get install nodejs-legacy
sudo apt-get install npm
- Installing Azure CLI package
sudo install azure-cli -g
More Information about Azure X Platform CLI
Configuring Azure Cross platform CLI
Before starting using Azure CLI tool, we need to pair it with our Azure subscription:
- Download the Azure subscription file
azure account download
- It should open the browser window and download publish setting file,
- Import the publishing setting file
azure account import AzureCredentials.publishingsettings
Installing Docker
In order to install Docker simply use the following command:
sudo apt-get install docker.io
Starting the Host
We need to have a host OS in order to have Docker on that. In this case our host OS is an Azure Virtual Machine. The OS we are using is Ubuntu 14.04 LTS.
azure vm image list | grep 14_04 | less
The above command lists all the vm images contains the word 14_04 (the version we are interested in). Find the version you prefer to use from the list.
Using the following command you can create the Host VM:
azure vm docker create -e 22 -l 'West US' bunny-ducker "b39f27a8b8c64d52b05eac6a62ebad85__Ubuntu-14_04_2_LTS-amd64-server-20150309-en-us-30GB" ausername apassword
Validating the Host VM
After running the above command, if everything ran successfully, we should be able to see the host OS in the azure portal.
- Login to Azure Portal,
- Check the VM section,

- When we were creating the VM, we asked Azure to use port 22 for SSH as well as username and password we can use
ssh ausername@bunny-ducker.cloudapp.net
And we should successfully be able to connect to the host OS. This shows that the VM has been created successfully.
- Using docker we can get the detailed information about the host OS. If the following returns the info it means that our host OS is ready.
docker --tls -H tcp://bunny-ducker.cloudapp.net:4243 info
By default, docker uses port 4243 but in case we want to use a different port, we can use –docker-port when we are creating the docker vm.
We successfully created the host OS. In the next post we will create containers on this host OS.