
Update: As of today Nov. 22, 2014, Azure BizTalk services are generally available and completely supported and backed by SLA.
Recently Azure added a new service that is in the preview. BizTalk services is a new part of the Azure family. You can apply for the preview version and it will be available right from the Azure console. It took few seconds for my case to get approved so it should be fast for you as well. In any case if the full functionality of BizTalk is required, Different versions of BizTalk 2013 are available in the VM Gallery.
Prerequisite
Install Visual Studio 2012
Install BizTalk Adapter Pack
Grab Windows Azure BizTalk Services SDK and install it.
Introduction
Azure BizTalk service is a subset of BizTalk available in the cloud. Currently it is more about EDI, and some sort of Itinerary based services. It is not supporting Orchestrations and BRE. However, it is said that they are going to be available in future. It seems that the main focus of BizTalk services is connecting on-premises services to the cloud. Using Service Bus relay makes it really easy to connect services in different locations to each other. Transformation and routing is being done by BizTalk Services.
Setting Up BizTalk Services
Before starting creating the services, you need to create the followings:
- A SQL Azure database: You can create it from the Azure console. For testing purposes I am using a 1 GB version.
- A Storage Instance: You can create it using Azure console.
- Access Control Namespace: You can create it using Azure Console. After you created the namespace, select it and click Manage. It redirects you to another portal for managing ACS. Click Service Identities, under Service Settings from the left side bar. Select owner (by default). Select password. Click Show Password. Copy and paste ACS namespace (check it out from gray menu bar on top), username (issuer name) that is "owner" by default, and the revealed password. You need these values multiple times.
- SSL certificate: You need to create a certificate in order to be able to deploy your service within Visual Studio. I recently installed Certificate Authority (because I can, and special thanks to Adrian) and using it to have control on my certificates. You can use whatever way you have. Just two things from MSDN documentations: the name of the certificate you are creating should be the name you are going to set for your service (e.g. testbts.biztalk.windows.net). Secondly it's better to be multi purpose. At least it give it Client and Server purposes.
Note: Make Sure all the above are in one Zone. Currently BizTalk services are only available in four zones.
After you have the above prepared, go to the BizTalk service menu and Click New, App services, BizTalk Services, Custom Create. It took me awhile to have the service ready (around 10 minutes), but the time may varies.
Creating Your First Service
There is a nice sample on MSDN using service bus relay and it works like magic. In this sample I am using a one way bridge, promote a property, and route to a FTP folder based on the value of that property.
Open Visual Studio 2012, in administrator mode, Create a new project. Select BizTalk Services, BizTalk Service. If installation of SDK was successful, you should be able to locate this option.

Create Source Schema
I used the existing Schema from MSDN example. This schema is used by BizTalk services to recognize the message we are sending to the bridge.
Right Click on the project and add a schema file. Create the following schema:
  <?xml version="1.0" encoding="utf-16"?>
  <xs:schema xmlns="http://ECommerceSalesOrder.Inbound"
  xmlns:b="http://schemas.microsoft.com/BizTalk/2003"
  targetNamespace="http://ECommerceSalesOrder.Inbound"
  xmlns:xs="http://www.w3.org/2001/XMLSchema">
  <xs:element name="SalesOrder">
  <xs:complexType>
  <xs:sequence>
  <xs:element name="CompanyCode" type="xs:string" />
  <xs:element name="PartID" type="xs:int" />
  <xs:element name="Quantity" type="xs:int" />
  <xs:element name="AskPrice" type="xs:decimal" />
  <xs:element name="RequestShipmentDate" type="xs:date" />
  <xs:element name="Address">
  <xs:complexType>
  <xs:sequence>
  <xs:element name="Line1" type="xs:string" />
  <xs:element name="Line2" type="xs:string" />
  <xs:element name="City" type="xs:string" />
  <xs:element name="State" type="xs:string" />
  <xs:element name="Country" type="xs:string" />
  <xs:element name="Zipcode" type="xs:int" />
  </xs:sequence>
  </xs:complexType>
  </xs:element>
  <xs:element name="Contact">
  <xs:complexType>
  <xs:sequence>
  <xs:element name="FirstName" type="xs:string" />
  <xs:element name="LastName" type="xs:string" />
  </xs:sequence>
  </xs:complexType>
  </xs:element>
  <xs:element name="Comments" type="xs:string" />
  <xs:element name="DateNow" type="xs:date" />
  </xs:sequence>
  </xs:complexType>
  </xs:element>
  </xs:schema>
Create Destination Schema
Before routing the source message to the FTP site, we are transforming it to the destination format. Create a schema file. The destination XSD file content is as below:
  <?xml version="1.0" encoding="utf-16"?>
  <xs:schema xmlns="http://EAIEDITutorial.LOB_Schemas.DestinationSchema"
  xmlns:b="http://schemas.microsoft.com/BizTalk/2003"
  targetNamespace="http://EAIEDITutorial.LOB_Schemas.DestinationSchema"
  xmlns:xs="http://www.w3.org/2001/XMLSchema">
  <xs:element name="Root">
  <xs:complexType>
  <xs:sequence>
  <xs:element name="SalesOrder">
  <xs:complexType>
  <xs:sequence>
  <xs:element name="SalesOrderID" type="xs:int" />
  <xs:element name="PartNum" type="xs:int" />
  <xs:element name="DateRequested" type="xs:dateTime" />
  <xs:element name="CompanyCode" type="xs:string" />
  <xs:element name="Qty" type="xs:int" />
  <xs:element name="UnitAskPrice" type="xs:double" />
  <xs:element name="ShipDate" type="xs:dateTime" />
  <xs:element name="SellToAddress" type="xs:string" />
  <xs:element name="BillToAddress" type="xs:string" />
  <xs:element name="PartnerContact" type="xs:string" />
  <xs:element name="CustomerComments" type="xs:string" />
  <xs:element name="RFQStatusID" type="xs:short" />
  </xs:sequence>
  </xs:complexType>
  </xs:element>
  </xs:sequence>
  </xs:complexType>
  </xs:element>
  </xs:schema>
Create Map
Now we are creating the map for transforming source message to the destination message. The map file in BizTalk services is not an ordinary XSLT file. It is a proprietary format (trfm extension). Right click on the project explorer and add a Map. Open the map and add the source and destination schemas to the left and right columns respectively. The map should look like as below:

Creating the Message Flow Itinerary
The project already contains a message flow itinerary (bcs extension). On this surface we can define message flow. First of all click on the flow surface and set the BizTalk service URL in the property window. The address should be something like https://[your BizTalk service namespace].biztalk.windows.net/. There are three main parts for each message flow:
- Source: The receive location, or in other words the receiver of the message. It can be FTP, SFTP, or HTTP. For every bridge there is one HTTP endpoint by default, so we don't have to define it if we only use HTTP (this example).
- Bridge: The pipeline that message passes through. Message can be routed, transformed, validated, and enriched throughout the bridge.
- Destination: The send location of the itinerary. There are lots of different destinations that can be choosed from the toolbox. In this example we are using FTP.
From the toolbox, drag and drop the followings to the designer:
- One Way Bridge: This works as our bridge.
- Two FTP destinations.
Connect bridge to the FTP destinations using Connector. As mentioned we do not need Source since we are using HTTP that is created by the bridge automatically. The message flow should look like this:
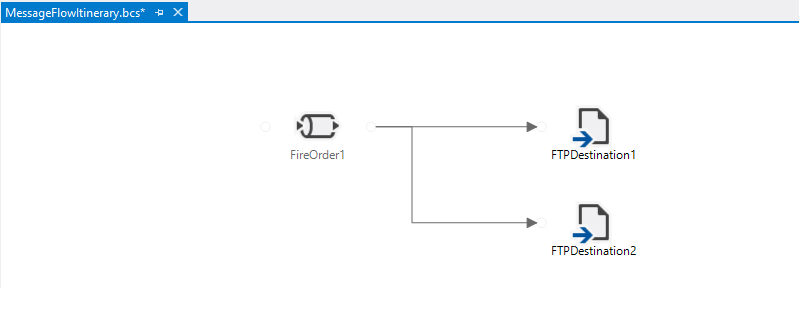
Configuring the Bridge
Using the bridge we can do most of the transformation, and enrichment operations required. Double click on FireOrder1 that is our bridge.
In the first box of the pipeline (Message Type) click on the add button and select the message type (Source Schema). If you are not selecting the message type, you will receive a runtime exception.
In The XML Transform box select the Map from the property window and select the map you created in previous section. based on the message type the map should be suggested to you automatically.
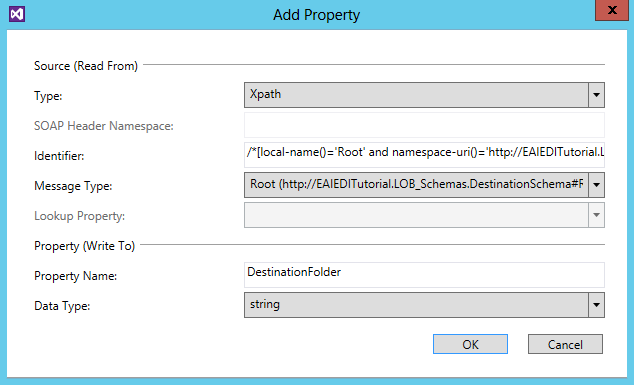
Before and after the transform box, there are Enrich boxes. We are using the one after the transform box. We can use message Enrichment in order to promote properties. We want to route messages to different directories using the Company Code value.
- Click on the Enrich box after transform,
- In the Property Window, select Property Definitions,
- Click Add,
- The type of definition is XPath since we use an XPath expression to get the Company Code element value, Identifier is the XPath of CompanyCode element from Destination schema; Message Type is the destination schema type. Property name is the variable name, I set as "DestionationFolder"; and finally its data type is string.
Configuring Destinations
Destination configuration is pretty much about connection parameters. Click on each of FTP destinations and from the property window fill in the values. In this sample I set the SSL to false as my FTP site does not support it. Leave the Folder Path empty as we are dynamically set this based on the promoted property we created in previous step.
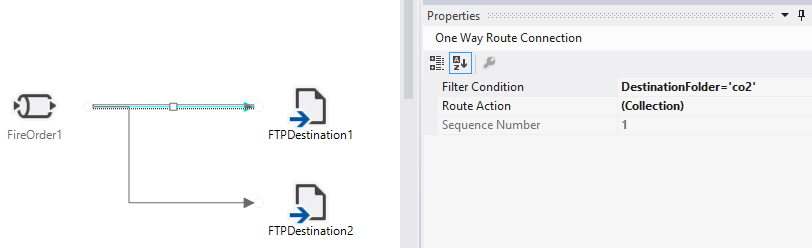
Filtering and Routing
By clicking on each connectors we can set the filters and routes. For example if the DestinationFolder (promoted property for CompanyCode element in destination file) is co2, then we route it to FTPDestination1:
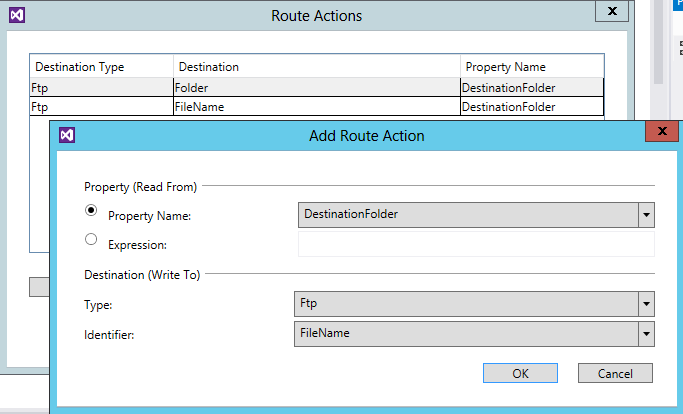
Now for Routing, Click on the ellipses of Route Action property. We set the Destination FTP folder and File name based on the company name. The promoted property is available in the drop down box.
Do the same for the second connector. The only difference is the Filter value should be something like DestinationFolder='co1' to route only co1 company messages to that connector.
Save the project and build it.
Deploying to Azure
The deployment is quite straightforward compared to BizTalk deployment. Make sure you have the certificate you used to create BizTalk Services installed on the dev machine. Right click on the project in the solution explorer and click deploy. A popup asks you the ACS namespace, Issuer name, and shared secret. You need to use the values you used to set up BizTalk Service in previous sections.
If everything is fine, the output window shows you the endpoint the bridge is deployed to. It should be in the following format:
https://[your service name space].biztalk.windows.net/default/FireOrder1
Testing the Service
Any application that can make HTTP calls can be user for testing. One of the easiest ways is to use Message Sender. Use the following format:
MessageSender.exe <ACSNamespace> <IssuerName> <Issuerkey> <RuntimeAddress> <MessageFilepath> <ContentType>
You already used ACS Namespace, Issuer name, and Issuer key for deployment in previous section. Runtime address is the Full bridge url. Something like https://[your service name space].biztalk.windows.net/default/FireOrder1. For message file path use a XML generated based on source schema. And for Content Type in this example use application/xml.
If the message sent successfully you receive a tracking number. You will notice that the message Will be routed to the correct folder in FTP server based on the company code.